

Easy DIY Ways to Repurpose Your Flowers
Last week, millions of flowers were gifted to loved ones on Valentine’s Day. If you were one of those that received a beautiful bouquet of flowers, we’re sure you were excited to receive them, and have been enjoying them all week. However, as time progresses, you know your blooms will begin to wilt and look tired (ahh, the circle of life). Inevitably, you’ll start thinking about tossing them out. We’re here to tell you: WAIT! Don’t toss out your flowers when they start to fade. Instead, extend the life (and beauty) of your blooms by easily transforming them into great spa-worthy products that will continue to pamper you long after Valentine’s Day.
As a flower wholesaler, we are obviously biased about the importance of flowers in people’s lives. It is well documented that flowers have an overall positive effect on people and their moods. No doubt, you’ve been experiencing that happiness with your recent gift of flowers. That said, in order to have beautiful flowers available, we need a healthy environment for them to grow. At 48LongStems, we are committed to helping our environment in as many ways as possible. From sourcing our products from environmentally responsible farms, to composting flowers and greens that we cannot use, to continuing to look for ways we can repurpose our flowers and materials into new products for new uses, we are always looking to reduce our footprint. With that in mind, before you throw your flowers away, transform them into one of these 4 seriously spa-worthy products that will not only extend the use of your flowers, and continue to bring you joy long after the Valentine holiday has passed.
Why are these our 4 favorites? Because they meet our criteria:
- EASY TO DO. Nobody has time for complicated.
- NO EXTRA PRODUCTS TO BUY. Well, almost most none. Most of the items used are probably in your pantry or bathroom right now
- PRODUCTS WE ACTUALLY ALREADY USE & SPEND $$ BUYING. So why not save $$ and make it ourselves!
- ALL NATURAL, HOMEMADE & TOTALLY SPA-WORTHY. Seriously, we all need a little self-indulgent luxury, and these are really good for you.
- FUN TO MAKE. Try it. You'll wonder why you never did this sooner.
- ALSO MAKE GREAT GIFTS!
So, if you are like us and want (or need) to indulge in some serious self-care time, but you don’t have the time or desire to take on some big, messy project, read on. Seriously, we had so much fun making these products, our staff decided we’re never tossing out old blooms again. These are just too easy to create, and are great for not only us – but to use as gifts. Talk about helping the environment, saving money, and a little personal luxury all at the same time – yeah, that’s our definition of winning!

First and foremost, all 4 of these projects involve drying your flowers. There are several methods for doing this, depending upon what you want to do with your dried flowers after. We found these to be the 2 simplest methods for us:
- Hang your flowers (best for making dried flower arrangements)
- Bake your flowers and/or petals in the oven (best for potpourri, bath salts & scrubs)
HANG DRYING TECHNIQUE

HANGING YOUR FLOWERS is one of the simplest, and most common methods of drying flowers and herbs. Dried floral arrangements have skyrocketed in popularity lately and they make an excellent reminder of your special bouquet.
DIRECTIONS:
- Pick the flowers you wish to dry – roses, mums, larkspur, stock, carnations, baby’s breath, lavender, chamomile, feverfew, and herbs do well with this method.
- Remove the leaves from your flowers.
- Use some hairspray to help seal in the color and to help your flowers retain their shape. A light spritz will do the trick.
- Create little bundles of flowers and secure with twine, ribbon, or even a rubber band. The key here is to not have too many flowers in a bundle, and to ensure the blooms are not smashed up against each other. Let the flower heads have some breathing room around them.
- If you have the room, stretching a cable, cording, heavy twine or even a thin rope taught across an area works great. Simply take your flower bundles and hang them upside down on the cable – with half the flowers on one side of the cable, the other half on the other.
- If, like us, this isn’t feasible, use a closet hanger. Tie your flower bundles upside down to a hanger. Just make sure you have some good air flow and space between bundles.
- Hang your flowers upside down, in a dark cool area. Basements, and closets work great for this, or even spare rooms, if you have them. If the area gets a lot of light, your flowers will fade a bit. Darkened areas allow for more color to be retained in the dried flowers. Also, you want to make sure there is good air flow around your flowers. If it doesn’t move, or is hot and muggy, your flowers may mold. You can use a fan to help circulate air, if necessary.
- Let your flowers dry for two weeks. Cooler locations will have shorter drying times, warmer locations may take a little longer. Just check on them periodically to see when they have fully dried before arranging them.

OVEN DRYING TECHNIQUE
Oven Drying is crazy easy and is perfect for making potpourri, bath salts and sugar scrubs.
DIRECTIONS:
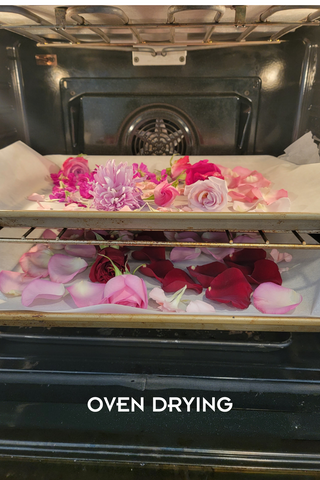
- Heat an oven to 180 – 200֯ F.
- Cover a baking sheet (or 2, or 3 depending on how much you want to make) with parchment paper. (Note: NOT WAX PAPER – wax paper will make your flowers and petals stick. Yuck!)
- Remove the petals of 3 – 4 roses (or more if you like) and place petals on parchment paper. Make sure they are not lying on top of each other.
- You can also place individual flowers directly on the parchment paper. Cut the stem off of your flowers, right where the stem attaches to the base of the flower. Place your flowers on the parchment paper covered baking sheets. Hint: spray roses and stock florets, along with smaller flowers look beautiful in potpourri as whole dried flowers. If you plan on making potpourri, dry some smaller blooms whole.
- You can also add slices of citrus (lemons, limes, oranges) to your baking sheets for additional texture, color and smell.
- If you like the smell of vanilla or cinnamon, you can also add a couple of vanilla beans or cinnamon sticks to your pans.
- If you want to increase the fragrance of your dried flowers, add 10 - 15 drops of your favorite essential oil to one tablespoon of water in a small spray bottle. Lightly spray your flowers.
- Place baking sheets in your oven.
- Check your petals and flowers every 30 minutes or so. Oven temperatures vary, as does your desired level of dryness. You want your flowers to be slightly crisp, but not burnt. We found that our petals dried within 45 minutes. Flower heads took longer depending upon the size of the flower. Even our largest flowers were fully dry within an hour and a half.
Once your flowers and petals are dried out, your ready to make the following:

DIRECTIONS:
- Follow the oven drying steps above.
- Once your flowers and petals are dry, remove from the oven and allow to come to room temperature.
- Gently mix your dried petals and flowers together, and place in a decorative bowl or drawer satchel.
- If you want to increase the fragrance of your potpourri mixture, spray flowers with essential oil and water mixture until you reach your desired strength.
- Over time, your fragrance may diminish. To refresh, simply respray your potpourri.

Bath salts aren't just luxurious, they can provide a myriad of therapeutic benefits such as: moisturizing and removing toxins from your skin, reducing inflammation, improving mood and reducing anxiety, providing needed minerals and trace elements. In addition, using bath salts can improve your sleep, temporarily soothe sore muscles and irritated skin, and improve circulation. With all these benefits, soaking in a hot tub with a scoop of your homemade, all natural bath salts isn't indulgent - it's downright necessary. And to top it off, this is probably one of the easiest DIY projects you can do and it costs practically nothing!
INGREDIENTS:
-
1 Cup of Dried Rose Petals (we found the petals from 3- 4 fresh roses produced enough dried petals for this DIY. Did you know rose buds
 and petals actually help rejuvenate your skin?)
 - Essential Oil (optional - increases the fragrance of your salts, but also different oils offer different benefits such as relaxation, stress relief, skin health, improved sleep, circulation and provide some respiratory relief)
- 1 Cup of Epsom Salts (helps to detoxify the body, reduce inflammation, soothes sore muscles, helps to draw toxins out of the body and improves the absorption of nutrients.)
- 1 Cup of Himalayan Sea Salt (optional - Himalayan Salt helps improve sleep, reduce inflammation, reduces muscle aches and pains, temporarily increases blood circulation and help detoxify your body)
- 1/2 Cup Baking Soda (helps soften skin and its alkalinity removes toxins)
- 1/2 Cup Powdered Milk (optional - amplifies skin softening when mixed with the baking soda. This is great if you have dry skin, or in cooler seasons.)
- Sealable container
DIRECTIONS:
- Dry rose petals, lavender and/or small rose buds using the oven drying method described above.
- Measure out the dry ingredients and mix together. Make sure to break up any clumps.
- When rose petals are dry, bring to room temperature.

- Add a few drops of your favorite essential oil to elevate the fragrance, if you wish. We used Rose Otto in one trial, and Lavender in another.
- Crush the rose petals into small pieces. If you dried lavender, remove the buds from their stems. This can be done by hand easily.
- We chose to leave the small, spray rose heads whole for looks and to up the luxury factor in the bath (Nothing like bathing with flowers to make you feel completely pampered.)
- Mix the crushed rose petals, lavender, and any small dried flowers into the salt mixture.
- Pour into your container. The longer the dried flowers and salts are incorporated together, the stronger the overall fragrance will be.
- Add a large scoop of your bath salts to your next soak for a seriously soothing and relaxing bath.

Sugar Scrubs are great way to exfoliate and remove dead skin cells from your skin. Sugar granules are gentler on skin than salt scrubs, and sugar's natural humectant properties make for a more hydrating scrub as it doesn't strip the skin of its natural oils.
Essential oils provide natural fragrance and aromatherapeutic qualities, but different types provide additional benefits. For example, Rose essential oils provide antibacterial properties which are effective against the bacteria that causes acne. Rose oils also include anti-oxidant and anti-inflammatory properties that provide anti-aging benefits as well. And if that isn't enough, rose oils have been shown to produce wellbeing by reducing stress and anxiety.
Lavender essential oils contain anti-inflammatory properties that have been shown to nourish and soothe dry skin which can help with eczema and psoriasis. Lavender essential oils also contain anti-oxidants that protect your skin from free-radical damage. In addition, lavender is known to calm nerves, improve sleep and enhances your overall mood.
INGREDIENTS:
- 1 Cup of Sugar (Granulated or brown sugar is fine)

- 1/3 Cup Fractionated Coconut Oil (We prefer the fractionated version because it is inexpensive and easier to blend in with the other ingredients. Regular Coconut Oil works just as well (increase amount to 1/2 cup), but you may need to use a food processor to blend all of your ingredients well. Regardless of the variety, coconut oil is very hydrating and will give your skin a silky feel.)
- 1 Cup of Fresh Rose Petals, OR, 1 Tablespoon of Dried Rose Petals, OR, 1/3 Teaspoon Dried Lavender Buds
- 50 Drops of Essential Oil (We used Rose Otto for the Rose Sugar Scrub, and Lavender Oil for the Lavender Sugar Scrub)
- 1/2 Tsp Vitamin E Oil (Vitamin E is one of the best products to hydrate, rejuvenate and hydrate your skin. It also prevents the coconut oil from going bad and prolongs the shelf life of your sugar scrub.)
- Airtight glass storage container (sugar scrub can dry out if not stored in an airtight container. If this happens, add )
DIRECTIONS:

- Blend Coconut Oil (known officially as the carrier oil), Essential Oil and Vitamin E Oil in a small mixing bowl. Stir to combine thoroughly.
- If using fresh rose petals, combine oil mixture with rose petals in a food processor and blend well.
- If using dried rose petals or lavender buds, combine them with your sugar.
- Pour the oil mixture over the sugar and mix thoroughly.
- Store your sugar scrub in an airtight glass container until ready to use. Unless your oils have an earlier expiration date, this sugar scrub recipe can be stored for up to 1 year.
- It is best to use a spoon or spatula to remove the sugar scrub from the jar. Do not get water into the scrub during use.
- Do not over exfoliate your skin. You should only use a sugar scrub 2 - 3 times per week. Over-exfoliating your skin can cause irritation.
We hope you find this blog helpful and inspiring. If you try any of these products, let us know by sending an email to: info@48LongStems.com